# 基于 Webpack 插件体系的 Mock 服务
# 背景

在软件研发流程中,对于前后端分离的架构体系而言,为了能够更快速、高效的实现功能的开发,研发团队通常来说会在产品原型阶段对前后端联调的数据接口进行结构设计及约定,进而可以分别同步进行对应功能的实现,提升研发速率。除了常见的研发流程提效之外,对于一些特殊的无法满足前后端联调场景下,也可在条件不允许的情况下进行 Mock 处理,等待条件满足后再进行真实的接口联调,如:网络不通、多地协同等。本文从前端研发过程中的 Mock 需求场景出发,结合前端业界通用的 Webpack 工程化的方案来提供 Mock 服务,以期能够给读者提供一些 Mock 工程化的实现方案借鉴。
# 架构
对于绝大多数业务开发而言,在目前成熟的生产实践中,前端开发团队仍然是以Webpack作为前端工程打包构建的主流工具。因而,对于前端 Mock 服务的工程化方案而言,前端工程架构基建团队提供适配Webpack体系的插件方案是一个不错的工程基建选择。虽然各方前端团队都以各大框架或者框架生态的脚手架方案进行构建,但大部分现有生态工程打包器底层仍然是以Webpack为主,如:@vue/cli、umi、create-react-app等。
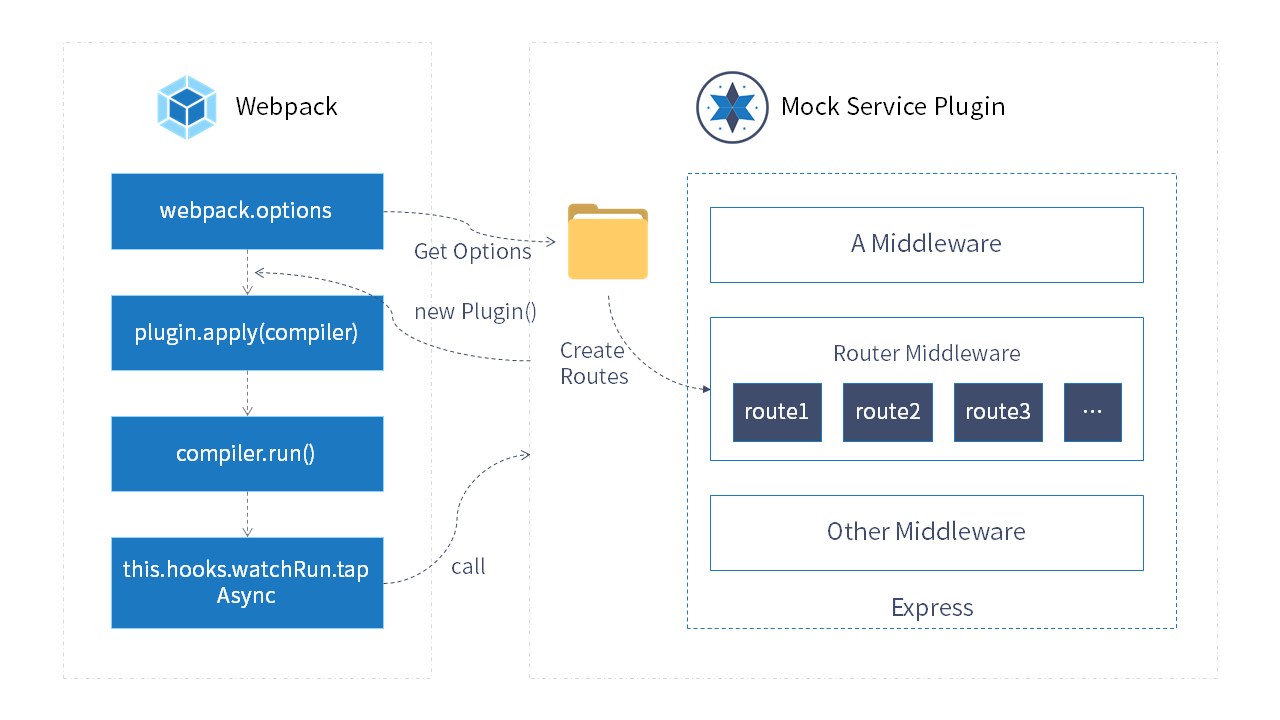
对于Webpack插件,其本质是一个类(ps:更准确的说是函数,JavaScript 中没有真正意义上的类),需要在类中定义apply方法,用于通过compiler对象挂载Webpack的事件钩子,该回调中可以获取到当前编译的compilation对象以及异步的callback。Webpack提供了丰富的插件入口,并通过tapable钩子事件系统,串联起整个Webpack钩子函数的生命周期流程。对于 Mock 服务而言,其实现的核心思路是在compiler的钩子watchRun进行 Mock 服务器的启动与监听,其 Mock 服务器可以是基于koa或者express的 node 服务器。
注意:在自定义 Webpack 插件时,Webpack4 和 Webpack5 中的守护进程模式、异步加载、定义全局变量、访问实例对象、事件监听器等方面均有所变化,需要开发者进行相应的兼容处理。
# 目录
├─ lib                                    // Mock服务的核心包
|   ├─ app.js
|   ├─ utils.js
├─ index.js                               // MockServiceWebpackPlugin插件导出
# 实践
对于项目工期较紧且某一时间段内无法进行前后端联调的场景下,业务开发下的实践可通过引入mock-service-webpack-plugin的插件进行前端 Mock。由于团队是基于 Vue 全家桶进行的业务开发,故而本实践案例以@vue/cli脚手架方案作为工程基建的底座来对业务中的某一个接口联调进行介绍。
在 Vue 脚手架配置中引入mock-service-webpack-plugin插件,对configureWebpack字段进行配置,代码如下:
const path = require("path");
const resolve = (dir) => path.join(__dirname, dir);

const MockServiceWebpackPlugin = require("mock-service-webpack-plugin");

const fs = require("fs");

const mockUrl = "http://localhost:9009"; // 不要与proxy代理服务端口重合

const filterPort = (url) => parseFloat(url.split(":").pop());

const plugins = [],
  proxy = {
    "/api": {
      target: "http://localhost:8198", // 不要与mock服务端口重合
      ws: true,
      pathRewrite: {
        "^/api": "",
      },
    },
  };

if (process.env.VUE_APP_MOCK) {
  plugins.push(
    new MockServiceWebpackPlugin({
      source: path.resolve(process.cwd(), "./src/mock"),
      port: filterPort(mockUrl),
    })
  );
  proxy["/mock"] = {
    target: mockUrl,
    ws: true,
    pathRewrite: {
      "^/mock": "",
    },
  };
}

module.exports = {
  // webpack config
  configureWebpack: {
    plugins,
  },
  devServer: {
    // https: true,
    // 端口配置
    historyApiFallback: true,
    port: 8888,
    // 反向代理配置
    proxy,
  },
};
在项目结构中新建一个目录用于放置相关的 Mock 数据接口,其需要和上述vue.config.js中的 Mock 设置目录相同,结构如下:
├─ src
|   ├─ mock                               // mock目录
|   |    ├─ screenConfig.js
|   ├─ api                                // 真实接口目录
|   |    ├─ BigScreenConfig.js
├─ .env.dev                               // 环境配置
├─ vue.config.js                          // vue cli打包相关配置
注意:通常来说,为了能使用到
Webpack的热更新机制,可将 Mock 目录放置到src下的某个目录中
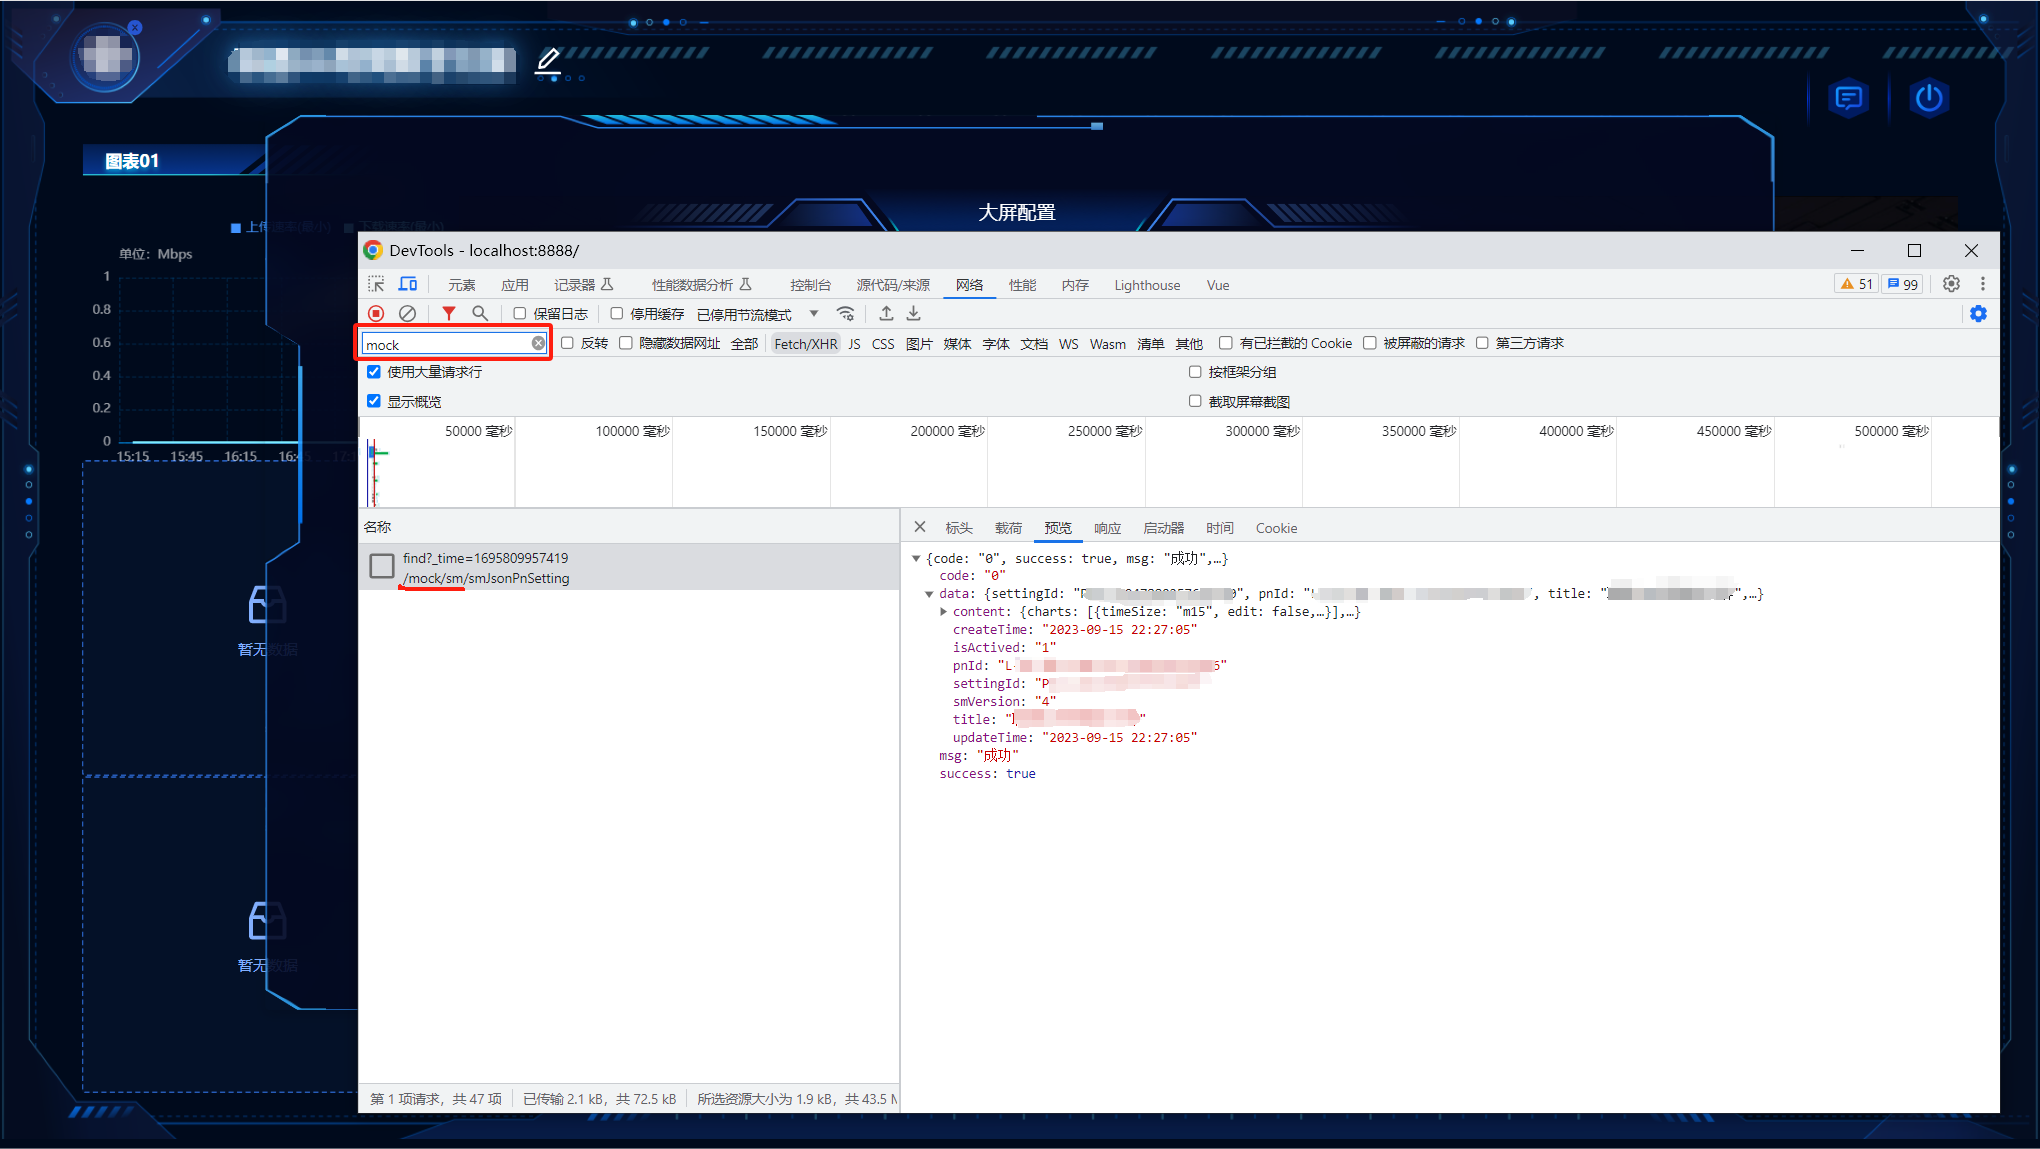
以其中一个大屏自配置的 Mock 接口为例,代码如下:
// src/mock/screenConfig.js

module.exports = {
  path: "/sm/smJsonPnSetting/find",
  methods: "POST",
  data: {
    code: "0",
    success: true,
    msg: "成功",
    data: {
      settingId: "settingId-16943333",
      pnId: "pnId-12345678",
      title: "数字大屏",
      createTime: "2023-09-15 22:27:05",
      updateTime: "2023-09-15 22:27:05",
      isActived: "1",
      content: {
        charts: [
          {
            timeSize: "m15",
            edit: false,
            tabs: [
              {
                lineOptions: {
                  chartType: "area",
                  list: ["上传速率(最小)", "下载速率(最小)"],
                },
                edit: false,
                staticTypes: [
                  {
                    kpiEnAlias: "userUprateAvr",
                    staticMethod: "Min",
                    neType: 5104,
                  },
                  {
                    kpiEnAlias: "userDownrateAvr",
                    staticMethod: "Min",
                    neType: 5104,
                  },
                ],
                title: "图表名称1",
              },
            ],
            id: 1,
            title: "图表01",
          },
        ],
        materials: {
          MaterialResource: {
            top: 900,
            left: 1300,
          },
          MaterialTimeDimension: {
            top: 58,
            left: 1200,
          },
          MaterialChangeView: {
            top: 100,
            left: 1900,
          },
          MaterialTraffic: {
            top: 900,
            left: 1600,
          },
          MaterialAlarm: {
            top: 900,
            left: 700,
          },
          MaterialSelectPn: {
            top: 65,
            left: 1400,
          },
          MaterialCard: {
            top: 900,
            left: 1000,
          },
        },
        logo: "cdn/screen/selfScreen3/default_logo.svg",
        conf: "大屏自配置",
        title: "数字大屏",
        layouts: [
          {
            draggable: false,
            y0: 1,
            x0: 1,
            y1: 2,
            x1: 2,
            id: "1",
            matchId: 1,
            content: "LayoutPerformanceIndex",
          },
          {
            draggable: false,
            y0: 1,
            x0: 2,
            y1: 4,
            x1: 6,
            id: "2",
            matchId: "",
          },
          {
            draggable: false,
            y0: 2,
            x0: 1,
            y1: 3,
            x1: 2,
            id: "4",
            matchId: "",
          },
          {
            draggable: false,
            y0: 3,
            x0: 1,
            y1: 4,
            x1: 2,
            id: "6",
            matchId: "",
          },
        ],
        bottomTabs: [
          {
            itemid: 1,
            src: "img/traffic.png",
            checked: false,
            id: "MaterialTraffic",
            title: "本月流量",
            value: 0,
          },
          {
            itemid: 2,
            src: "img/resource.png",
            checked: false,
            id: "MaterialResource",
            title: "资源概况",
            value: 514,
          },
          {
            itemid: 6,
            src: "img/card.png",
            checked: true,
            id: "MaterialCard",
            title: "号卡详情",
            value: 5,
          },
          {
            itemid: 5,
            src: "img/alarm.png",
            checked: false,
            id: "MaterialAlarm",
            title: "设备告警",
            value: 0,
          },
        ],
      },
      smVersion: "4",
    },
  },
};
对于是否开启 Mock 服务,可借助脚本通过.env变量进行控制,代码如下:
VUE_APP_MODE=dev
VUE_APP_MOCK=false
而在页面中对 Mock 与真实接口基于环境变量来进行切分,代码如下:
// api.js
import axios from "axios";

let BaseAxios = axios.create({
  timeout: 60000,
});

let APIGetFind = async function (params) {
  return await BaseAxios.post("api" + "/sm/smJsonPnSetting/find", params);
};

let MockGetFind = async function (params) {
  return await BaseAxios.post("mock" + "/sm/smJsonPnSetting/find", params);
};

// main.js
Vue.prototype.$mock = process.env.VUE_APP_MOCK;
<script>
import { APIGetFind, MockGetFind } from "@/api/BigScreenConfig";

export default {
  data() {
    return {
      settingId: "",
    };
  },
  methods: {
    async useEffect() {
      console.log("this.settingId", this.settingId);

      const res = this.$mock
        ? await MockGetFind({
            settingId: this.settingId,
          })
        : await APIGetFind({
            settingId: this.settingId,
          });

      console.log('res', res);
    },
  },
};
</script>
对于package.json中的脚本设置,代码如下:
{
  "scripts": {
    "serve": "vue-cli-service serve",
    "serve:dev": "cross-env VUE_APP_MODE=dev npm run serve",
    "serve:dev_mock": "cross-env VUE_APP_MODE=dev VUE_APP_MOCK=true npm run serve"
  }
}
# 源码
# index.js
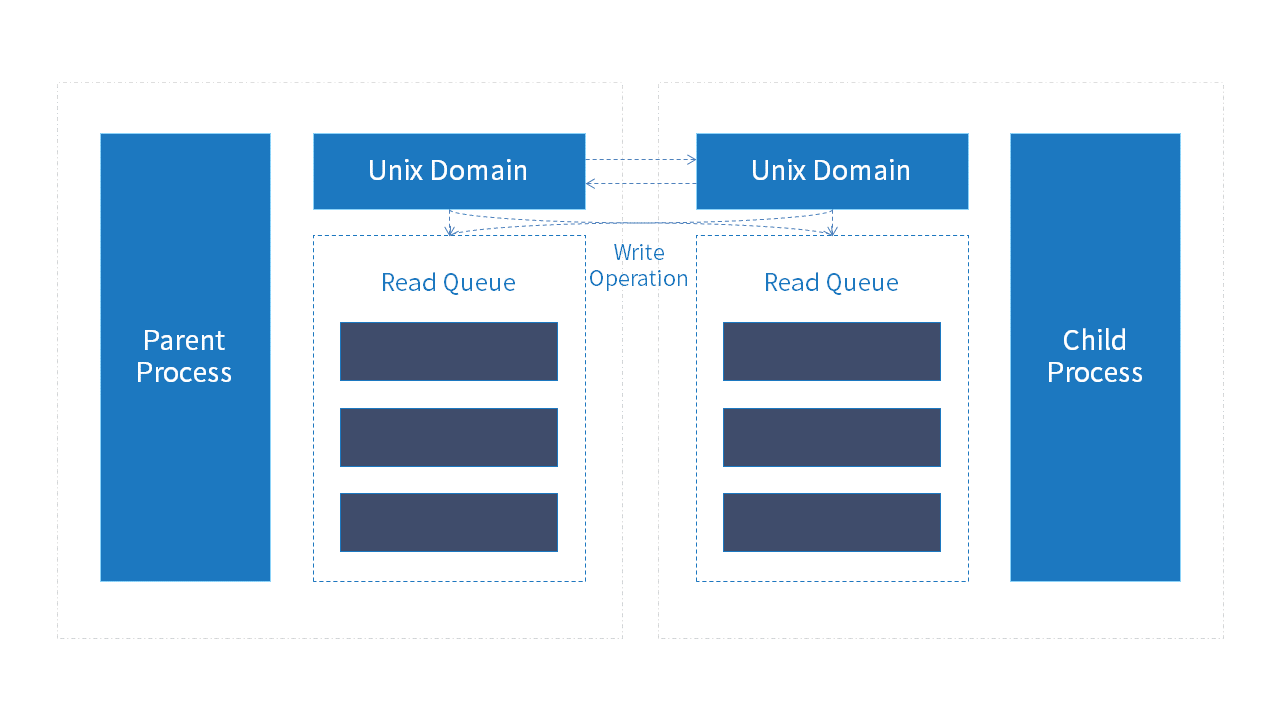
Webpack插件mock-service-webpack-plugin的入口,导出MockServiceWebpackPlugin类,使用进程间通信对 Mock 服务器和本地 Web 开发服务器进行响应,代码如下:
const path = require("path");
const fs = require("fs");
const { fork } = require("child_process");
class MockServiceWebpackPlugin {
  constructor(options) {
    this.options = options;
  }
  apply(compiler) {
    const { source, port = "9009" } = this.options;
    if (!source) {
      console.error(
        `Mock Directory did not exist. Please make sure your Mock Source Directory`
      );

      if (!fs.existsSync(source))
        console.error(
          `${source} did not exist. Please make sure your Source is Correct`
        );
    }

    let child;

    child = fork(path.resolve(__dirname, "./lib/app.js"), [], {
      encoding: "utf8",
      execArgv: process.execArgv,
    });

    child.send({ source, port });

    compiler.hooks.watchRun.tapAsync(
      "MockServiceWebpackPlugin",
      (compilation, callback) => {
        console.log("compiler watching...");

        fs.watch(source, { recursive: true }, (eventType, filename) => {
          console.log("eventType:", eventType, "filename:", filename);
          child.kill("SIGKILL");
          child = fork(path.resolve(__dirname, "./lib/app.js"), [], {
            encoding: "utf8",
            execArgv: process.execArgv,
          });
          child.send({ source, port });
        });
        callback();
      }
    );
  }
}

module.exports = MockServiceWebpackPlugin;
# lib
# app.js
app.js是基于express启动的 Mock 服务器,也是实现 Mock 服务路由的核心,代码如下:
const express = require("express");
const bodyParser = require("body-parser");
const fs = require("fs");
const path = require("path");
const app = express();
const router = express.Router();

const { createRoutes } = require("./utils");

app.use(bodyParser.json());
app.use(
  bodyParser.urlencoded({
    extended: false,
  })
);

process.on("message", ({ source, port }) => {
  console.log(`Options get From Parents`, source, port);

  createRoutes(router, source);

  app.use(router);

  app.listen(port, () => {
    console.log(`Mock Server Listen ${port} is Running`);
  });
});
# utils.js
utils.js主要用于 HTTP 请求的相关处理,基于用户的 Mock 服务的 options 进行相应的路由动态生成,代码如下:
const fs = require("fs");
const path = require("path");

const METHODS_MAP = {
  POST: "post",
  GET: "get",
  DELETE: "delete",
  PUT: "put",
};

const createRoutes = (router, p) => {
  const stats = fs.statSync(p);

  if (stats.isDirectory()) {
    fs.readdirSync(p).forEach((item) => {
      createRoutes(router, `${p}/${item}`);
    });
  } else if (stats.isFile()) {
    const { path, methods, data } = require(`${p}`);
    if (!methods)
      console.error(
        `Methods did not exist. Please make sure your method is one of ${Object.keys(
          METHODS_MAP
        ).join(" ")}`
      );

    if (!data)
      console.error(
        `Data did not exists. Please make sure your data is correct`
      );

    router[METHODS_MAP[`${methods}`]](path, (req, res) => {
      res.json(data);
    });
  }
};

module.exports = {
  createRoutes,
};
# 总结
除了基于 Webpack 的前端工程化构建,对于Rollup、Vite以及Gulp等其他前端打包构建工具也是现代化前端工程团队需要纳入考虑的工程基建范畴。对于完整的 Mock 服务,也可提供平台服务、IDE 插件等形式来帮助业务团队更好的提升效率及开发体验,工具从来都是服务的承载形式,重要的不是功能本身,而是体验带来的效率优化。
对于前端工程化而言,Mock 服务仅仅是开发流程中的一环,面对日益增加的成本及业务压力,如何有效的提升效率,实现工程效率才是前端工程师应该考虑的重中之重。不仅仅在于企业效益的间接贡献,更重要的是前端工程化实践也是平台工程乃至软件工程方向的重要组成部分,所有的工程能力的提升都是工程师应该一直致力于培养的重要能力,共勉!!!
ps: 最后,对于mock-service-webpack-plugin的实现感到不错的同学,欢迎点个小小的 star,您的 star,是我们最大的动力~~~
# 参考
- Webpack 钩子函数
- webpack 的自定义插件学习
- 学 webpack 前先看看 tapable 吧
- Webpack HMR 原理解析
- Webpack 原理浅析
- 前端该如何优雅地 Mock 数据
- 详解如何优雅在 webpack 项目实现 mock 服务器
- mock 服务搭建
- Webpack 实战:本地 mock 开发模式实践
- 基于 webpack-dev-server 搭建 mock 服务
- 编写 webpack 插件-webpack-mock-service-plugin
- 【webpack 插件篇】webpack-plugin-mock 一款 mockjs 的 webpack 插件,配置简单、易用
- 从零开始搭建一个 mock 服务